Instructions for handling indoor and outdoor Blimps as well as Aerostats
Instructions how to set and use Indoor or Outdoor RC Blimps and Aerostats
Warning: Our outdoor blimps are designed for Grisolar (Balloon gas) helium which is according to European standards. That quality is different around the world (somewhere helium is "dirtier" and therefore has a lower payload), so we recommend that you use helium 4.6, which should be of the same quality everywhere in the world. (Note:Indoor blimps (LTA in general) also require good quality helium that you use)
⚠️ IMPORTANT: The knowledge required to operate indoor blimps is beginner and above
Indoor Blimps
IMPORTANT: A blimp is not a drone (quad, helicopter, plane,...) but a lighter-than-air aircraft. Which means that the style of setup and piloting is unique to blimps. The most important thing is that you balance it well and that its horizontal axis is parallel to the ground. A well-balanced blimp is one that just floats in place with no lift up or down - it just floats. That way, you will easily and simply pilot it and enjoy it.
How to inflate the envelope Attach the inflation hose to the helium cylinder reduction valve, then connect the safety tether to secure the balloon. Begin inflating the balloon with helium at a very low pressure; since the gas in the cylinder is under high pressure, a sudden rush of gas risks damaging the envelope. Initially, inflate the balloon to 80–90% of its capacity. Do not fill it completely at this stage, as this allows the gas to adapt to the ambient room temperature.Next, mount the cabin and fins to their designated positions using the Velcro strips. Once these components are in place, top off the helium to reach full capacity. A properly inflated blimp feels firm in the center while maintaining minor wrinkles at the front and rear joints. Finally, after the blimp is fully inflated and all components are securely attached, proceed to balance the aircraft.
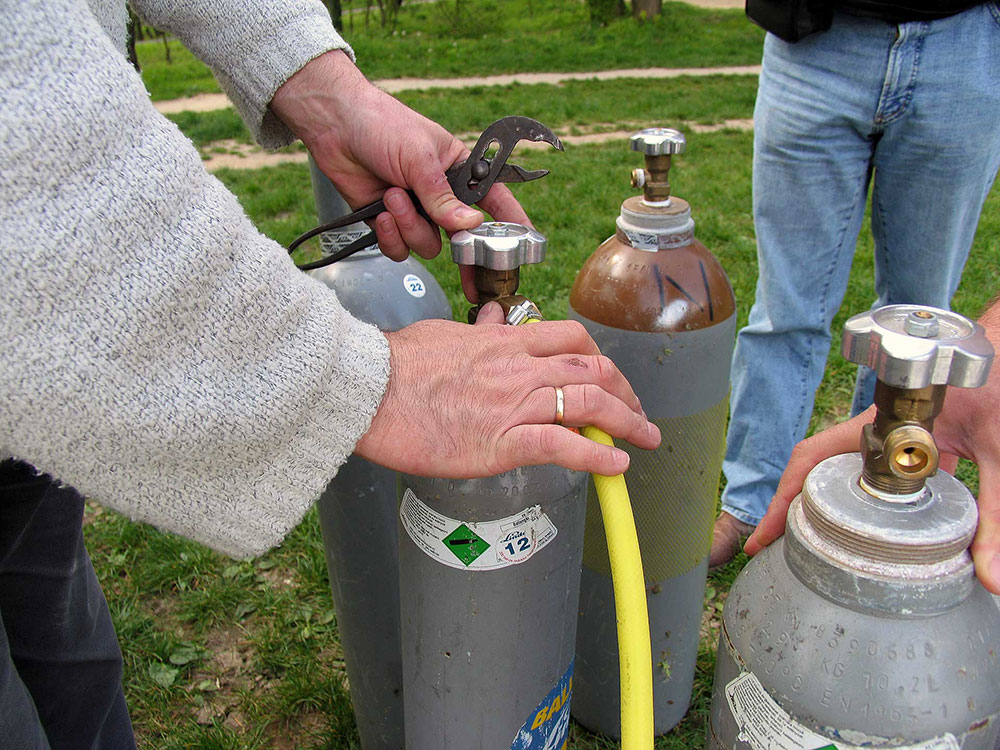 It is mandatory to use a pressure reducer on the helium container
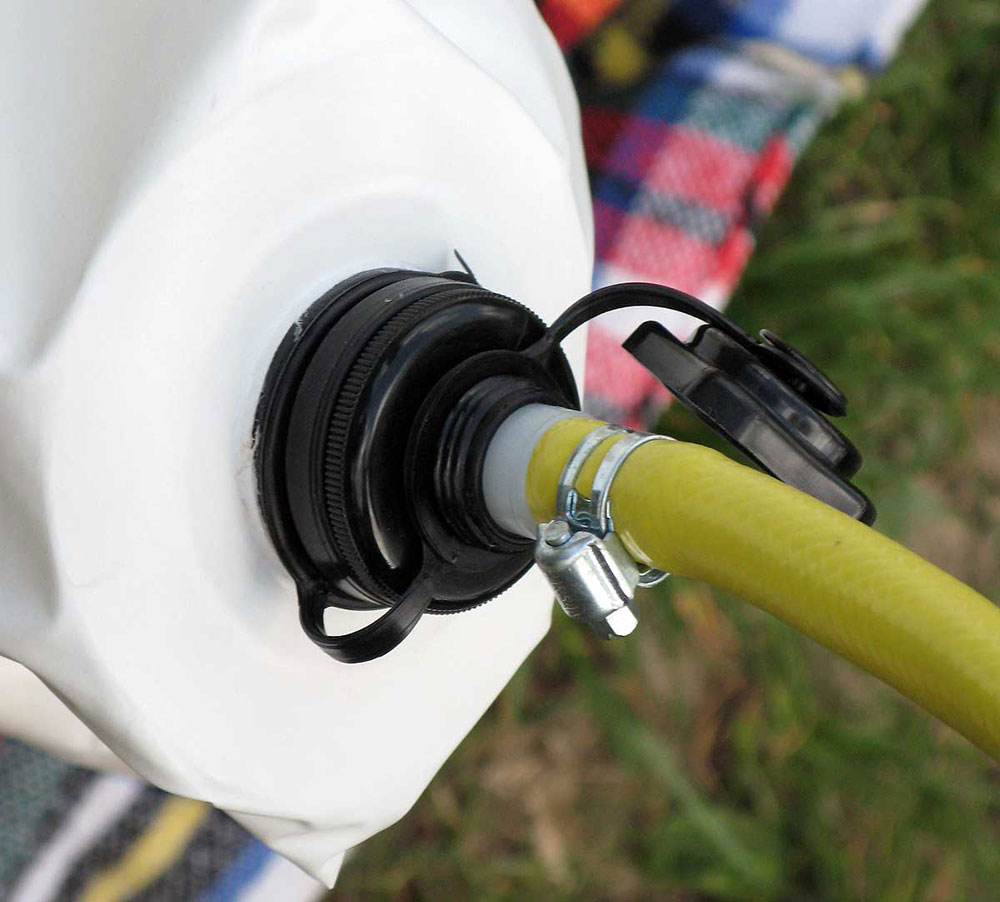 Just insert the Scoprega valve adapter inside the valve neck
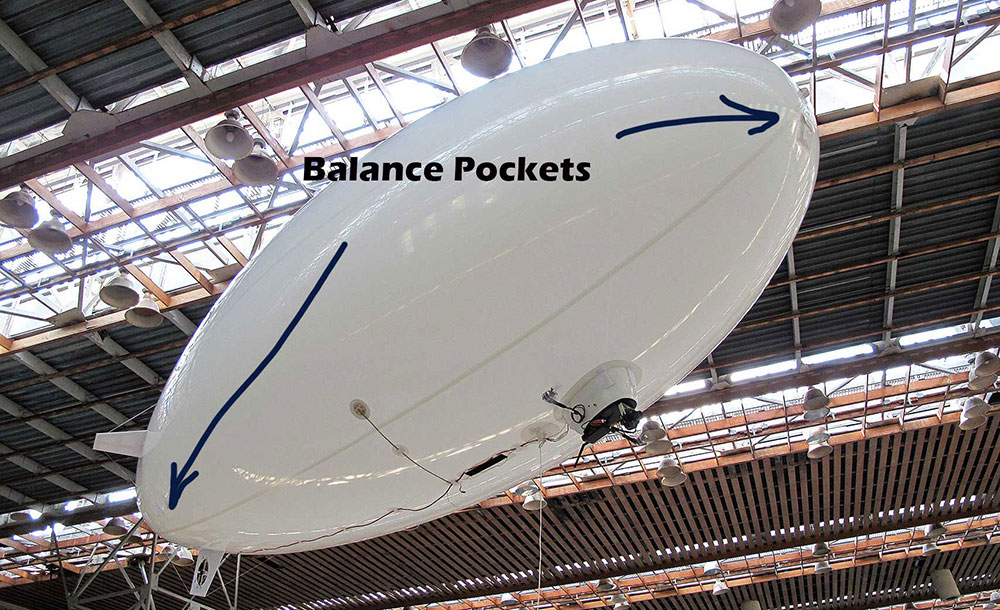
Balancing the Blimp
There are ballasting weight pockets located at both the front and rear of the blimp. To achieve proper balance, you should insert the provided lead weights into these pockets as needed. A well-balanced blimp is characterized by its ability to float completely horizontally, remaining perfectly parallel to the ground. It must achieve neutral buoyancy, meaning it should neither rise nor sink, but simply hover steadily in its current position.The precise balance of the blimp is critical for safe and efficient operations. It directly affects the overall flight handling, significantly reduces battery consumption, and ensures an immediate, precise reaction to all remote control (RC) commands.
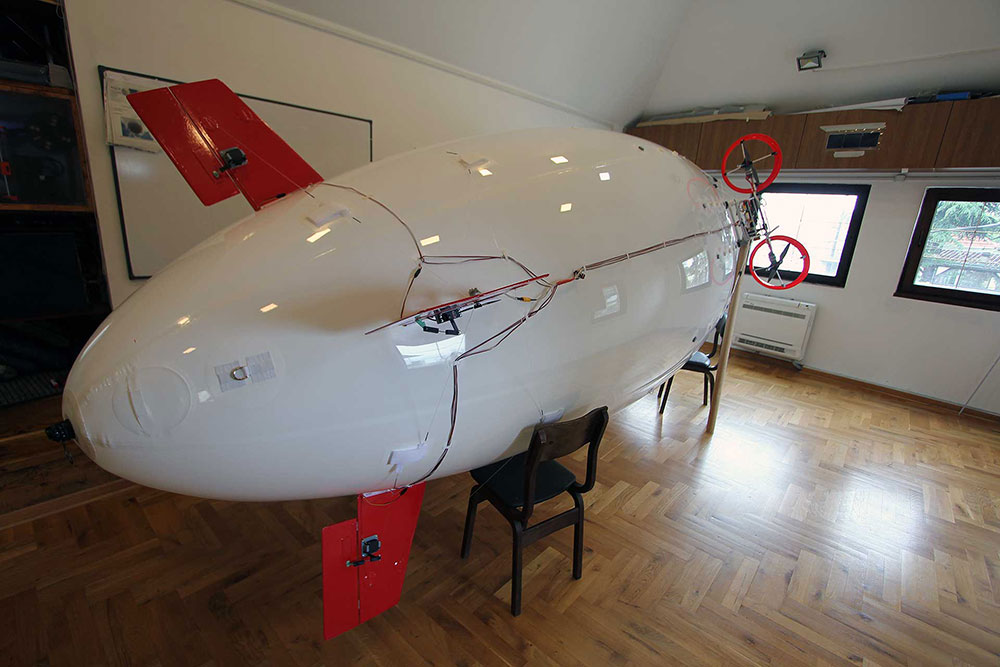
 Ballance points on the indoor Blimp
How to fly and control the Blimp
Always switch on the remote control (RC) transmitter first and turn it off last. The right joystick manages the orientation of the main motors, controlling the up, down, forward, and backward movements across its full range of motion. This same joystick also operates the rear reverse motor to provide precise left and right steering control. The left joystick is utilized to regulate the throttle from 0 to 100% using vertical movement, and it also operates the optional dropping mechanism via left and right movements, if the model is equipped with one.Please note that every blimp we ship undergoes rigorous and complete testing. Following these instructions carefully ensures a seamless and highly enjoyable flying experience with our indoor RC blimps. As a safety precaution during prepflight setups, always remember to utilize the safety tether to secure the envelope firmly in place.
 Typical RX/TX setting
A short reminder and useful tips
For first-time pilots, we highly recommend setting up the blimp completely and performing initial flights while utilizing the provided safety line. This line should be securely attached behind the cabin, near the main motor assembly. Once you have mastered the controls and feel confident in your piloting skills, you can safely detach the safety line and enjoy free flight. Please note that a single battery charge provides between 20 and 40 minutes of flight time, depending heavily on your piloting style. To avoid sudden loss of control, always land and replace the battery in a timely manner.Operating safety is paramount, and extreme caution must always be exercised when flying the aircraft over people. Never attempt a flight if you are not entirely certain that the blimp is fully operational. Additionally, always adhere to the following critical operational guidelines: never fly with uncharged batteries, always re-verify the physical balance before release, and top up the helium levels if you notice any loss of buoyancy. The aircraft must never be left unattended, and the remote control signal must never be switched off while the blimp is airborne. Remember the golden rule of operation: always switch the RC transmitter ON first and turn it OFF last. To ensure long-term smooth operation, the servo-controlled main axis, which houses the two brushless motors, must be lubricated periodically. Always perform a comprehensive pre-flight check of all critical systems, including the main front motors, the rear reverse motor, and the axis servo, before releasing the vehicle.Please be advised that Aero Drum Ltd. does not assume any responsibility or liability for the use of its RC Blimps, aerial photography systems, or any other related products by the end client. While we manufacture all of our products to the absolute best of our abilities and engineering standards, the actual, real-world deployment and operation are entirely at the client's own discretion, choice, and skill level.
Outdoor Blimps
⚠️ IMPORTANT: The knowledge required to operate outdoor blimps Advanced and above
We strongly recommend approaching the deployment of outdoor RC blimps through a gradual, step-by-step training process. The first step involves inflating the envelope with regular air indoors and assembling all structural components. This allows you to familiarize yourself with the fully equipped aircraft's layout and appearance without any operational risk.For the second step, inflate the blimp with helium indoors to practice using the remote controls. This phase is crucial for developing an accurate feel for how the aircraft reacts and behaves under lighter-than-air conditions.The third step takes the training outdoors. After completing the first two phases, inflate the blimp with helium in an open space, but keep it securely attached to a safety tether while practicing your RC commands. This method ensures you gain essential outdoor piloting skills under varying air currents with zero risk of losing the aircraft.Finally, the fourth step allows you to detach the safety line and begin free-flying operations outdoors, but only after you have successfully mastered the first three phases.
Difference between indoor and outdoor Blimps
Unlike indoor models, operating outdoor RC blimps requires a certain level of experience and skill in piloting radio-controlled aircraft. While indoor flying is virtually risk-free due to controlled environments, outdoor operations present unique meteorological challenges. However, a remarkable and distinct feature of RC blimps is their inherent ability to self-stabilize when you completely neutralize the controls. If a maneuver is executed incorrectly, simply release the joysticks on the transmitter, and the blimp will naturally stabilize itself in the air.Due to the large surface area of the envelope, outdoor RC blimps are inherently sensitive to wind conditions and effectively act as large sails. Consequently, we strictly recommend operating the aircraft in sustained winds of up to 10 km/h, with maximum gusts not exceeding 15 km/h. Depending on the specific blimp design and the pilot's experience, operations in slightly stronger winds may be possible, but extreme conditions must always be avoided. To ensure the safest and most stable flight conditions, we strongly advise our clients to schedule flights for early mornings or late afternoons, as wind speeds typically decrease during these hours.
Inflating the Blimp
If possible, it is highly recommended to perform the initial assembly and setup of the blimp inside a large, enclosed space. As a smart precaution, you should first inflate the envelope with regular clean air instead of helium to familiarize yourself with all the structural components. If an indoor space is unavailable, extraordinary caution must be exercised during outdoor setup. To protect the delicate envelope from accidental punctures or abrasions, always lay down a protective ground cloth or film on the floor first, then unpack and gently unpack and spread the envelope over it. Additionally, ensure the envelope is securely tied with safety ropes to prevent it from accidentally drifting away during the helium inflation process.There are several grades of helium available on the market, ranging from standard balloon gas (often referred to as Ballongas or Grisolar) to high-purity Helium 4.6 and Helium 5.0. Our blimps are specifically engineered to operate efficiently on standard balloon-grade helium, which contains mixtures of other ambient gases. We highly recommend using this type, primarily due to its cost-effectiveness. However, using higher purity, more expensive helium is also perfectly acceptable, depending on your budget and operational requirements.To begin inflation, connect the filling hose to the helium cylinder and slowly introduce the gas into the envelope. It is critical to use the lowest pressure setting possible to prevent rapid gas expansion or thermal cooling from damaging the envelope material. For the initial inflation phase, fill the blimp to approximately 90% of its total capacity, then pause. This allows the gas to stabilize and equalize with the external ambient temperature. While the gas adjusts, you can begin fitting and securing the remaining hardware components onto the envelope.
 Place all components on the blimp, fasten and check all connections
Setting all components on the envelope
Once the envelope is inflated to 90% capacity and has lifted off the ground, you can proceed with installing the external components. A standard outdoor blimp configuration typically includes the following hardware: stabilizers equipped with control flaps (generally four pieces), a main gondola housing the flight batteries and electronic components, a built-in safety pressure valve integrated into the envelope, and a safety spool wound with 100 meters of tether line. On larger blimp models, the setup also features a rear reverse motor mounted on the tail, alongside an additional auxiliary battery and a secondary, synchronized radio receiver (RX).Please be assured that all systems and components are thoroughly tested and synchronized in our workshop prior to packaging and shipping. Each component or sub-assembly utilizes a unique, dedicated attachment and suspension system, making incorrect installation virtually impossible. To ensure absolute accuracy during the assembly process, we highly recommend referencing the official reference photographs provided with your shipment while working on the aircraft. When the Blimp is filled with gas up to 90% and with all components, you can move on to balancing.
Balancing the Blimp
Properly balancing the blimp is key to achieving smooth and stable flight characteristics in open spaces. Please note that the safety tethers must remain attached during this stage. You may now proceed to inflate the envelope to 100% capacity. The blimp is considered fully inflated when the center section is firm to the touch, while the nose and tail areas remain slightly soft. Natural wrinkles near the welded seams at both ends of the envelope are completely normal and expected.The electronics gondola can be adjusted across several positions along the parallel rail mounting system. While the gondola is typically secured in the foremost position for standard operations, it can be relocated further back to accommodate additional payloads, such as camera systems or specialized equipment. Once all components are installed, the blimp should sit relatively parallel to the ground along its horizontal axis. This initial alignment does not need to be perfect, as it serves as the baseline for fine ballasting. Fine balancing is performed by inserting the provided lead weights into either the front or rear ballast pockets. A well-balanced outdoor blimp should remain parallel to the ground and, when fully released from the safety lines, descend very gently toward the ground nose-first. Maintaining this slight heavy-than-air status is easily compensated for by the motor power, while significantly improving overall flight handling and wind resistance.
Flying the Blimp
For your initial flights, we highly recommend operating indoors or during periods with minimal to no wind. This controlled environment significantly eases the ballasting process and helps you comfortably learn the flight dynamics of the RC blimp. To begin, we suggest keeping the blimp secured to its rear safety tether. This allows you to safely develop an accurate feel for how the aircraft responds and behaves under power.The moment you feel confident that you have mastered these operational basics, you can fully release the tether and begin practicing free flight by performing short, controlled circles.Never operate the blimp alone. Always ensure you have a dedicated assistant or spotter to assist with launching and catching the blimp during landings. This teamwork is essential to prevent potential ground impacts and avoid any unnecessary or costly structural damage.
Typical RX/TX setting
Aerostats
⚠️ IMPORTANT: The knowledge required to operate Aerostats Advanced and above
Introduction
Although blimps and aerostats both belong to the LTA (Lighter-Than-Air) family, their primary operational concepts are fundamentally different. When properly balanced, indoor blimps should achieve neutral buoyancy, literally hovering in place without rising or sinking. Outdoor blimps differ slightly, as maintaining a minor heavy-than-air status is preferred to improve handling, though the core flight principles remain the same. Conversely, aerostats are engineered to generate substantial aerodynamic lift and tether pull. While limitless lifting force would be ideal, current technological standards require optimizing the ratio between payload capacity and upward tether tension. The ellipsoid aerostat—which can also be manufactured in spherical or Zeppelin shapes—functions as a hybrid between a kite and a helium balloon. Its primary design objective is to combine the advantages of both systems, resulting in an exceptionally stable platform with the necessary lifting power to maintain high in-air stability. As with any aircraft, understanding and respecting the operational procedures is essential. Adhering strictly to these protocols ensures reliable, safe, and highly professional results in your operations.
Inflating the Aerostat
The envelope is manufactured from high-grade polyurethane, an exceptionally elastic material that offers superior helium-retention properties. Although the material features natural elasticity, extraordinary care must be taken to avoid over-inflation. Helium gas—whether standard balloon gas or Grisolar formulations—is highly sensitive to thermodynamic changes, expanding and contracting significantly under the influence of heat, cold, and varying atmospheric pressure. Therefore, during the initial inflation phase, you must fill the envelope to only 85% of its total capacity. Once this is done, install the stabilizer sail and the camera rig, allowing the gas sufficient time to adapt and equalize to the external ambient temperature. After the gas has fully stabilized, you may proceed to inflate the envelope to its full operational capacity.To ensure structurally sound assembly and rigging, the lines and hardware are categorized into the following dedicated rigging groups:Primary. Front Attachment line: Dedicated anchoring nodes on the nose section for forward stability and towing. Rear Attachment Points: Reinforcement nodes on the tail section, primarily utilized for stabilizing lines or reverse motor mounts. Camera & Equipment Mount: The centralized, heavy-duty suspension system designed to securely hold the camera rig or auxiliary payload. Stabilizer Sail Attachment Points: Specific mounting tracks engineered to secure the aerodynamic fins and stabilizer sails in place.
 Typical Aerostat attachment points
The front rigging lines (indicated as 1, 2, and 3 on the technical diagram, depending on your specific model and size) are factory-preset in our workshop. These lines serve as the absolute baseline for setting up the aerostat correctly. Your primary task during manual rigging is to adjust the length of the stabilizer sail line and the rear equatorial lines (two anchoring points on the back that merge into a single tether rope).To begin inflation, connect the provided filling hose with the specialized adapter to the envelope valve. On the other end of the hose, a certified pressure reduction regulator must be installed on the helium cylinder. (Critical Safety Note: The internal pressure of a standard helium cylinder is 200 Bars. Attempting to inflate the envelope without a pressure reduction regulator risks catastrophic failure and serious personal injury). Start inflating the envelope slowly and progressively to avoid thermal shock and frosting of the polyurethane material.As a mandatory safety precaution during the inflation phase, always utilize the provided safety line to secure the envelope firmly until it is fully configured and connected to the main operational tether. Additionally, it is highly recommended to wear protective work gloves to safeguard your hands during the setup, handling, and flight operations.Once the envelope is inflated to approximately 85–90% of its capacity, you can begin the fine adjustment of the lines. Since the front-line length is already factory-set, you must first adjust the rear line (indicated as 6 on the diagram). Configure it so that the nose of the aerostat is tilted downward by 10% to 15% relative to its true horizontal axis while on the ground. This pitch angle is extremely important; as the aerostat lifts off, the aerodynamic wind forces will naturally level the aircraft horizontally. If the nose is not pitched 10–15% downward on the ground, the aerostat will fail to level itself in flight, resulting in excessive aerodynamic drag, reduced lift efficiency, and severe instability.
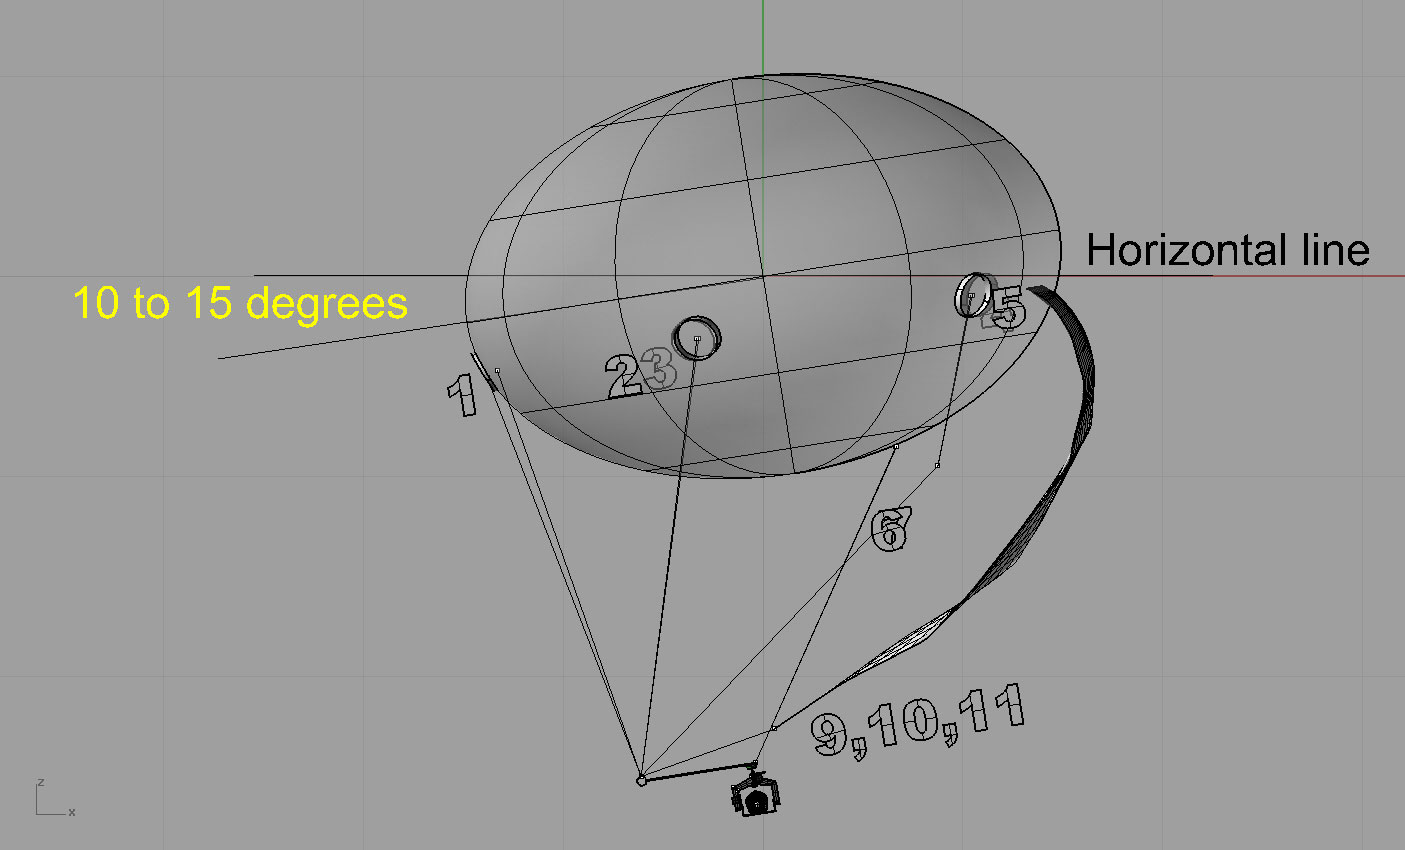 Adjusting the attack angle of the Aerostat
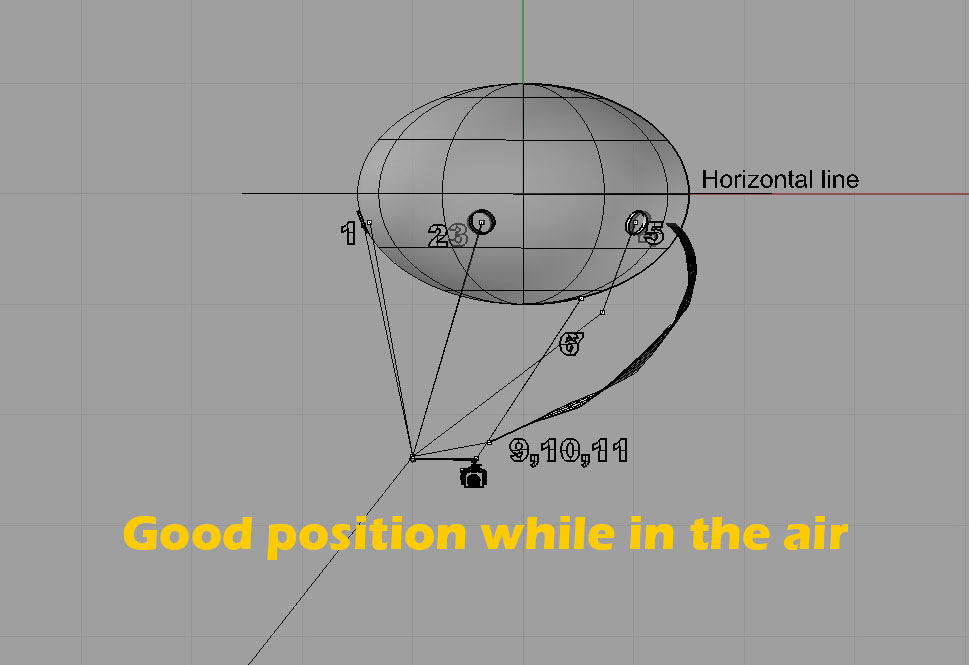 Well set and attached Aerostat
Once the primary envelope rigging lines are securely adjusted, you should proceed to set up the stabilizer sail line. The sail configuration features three baseline positions to accommodate different operational needs. For general deployment and optimal all-around stability, we strongly advise setting the lines to the medium/moderate position and leaving them in that configuration.
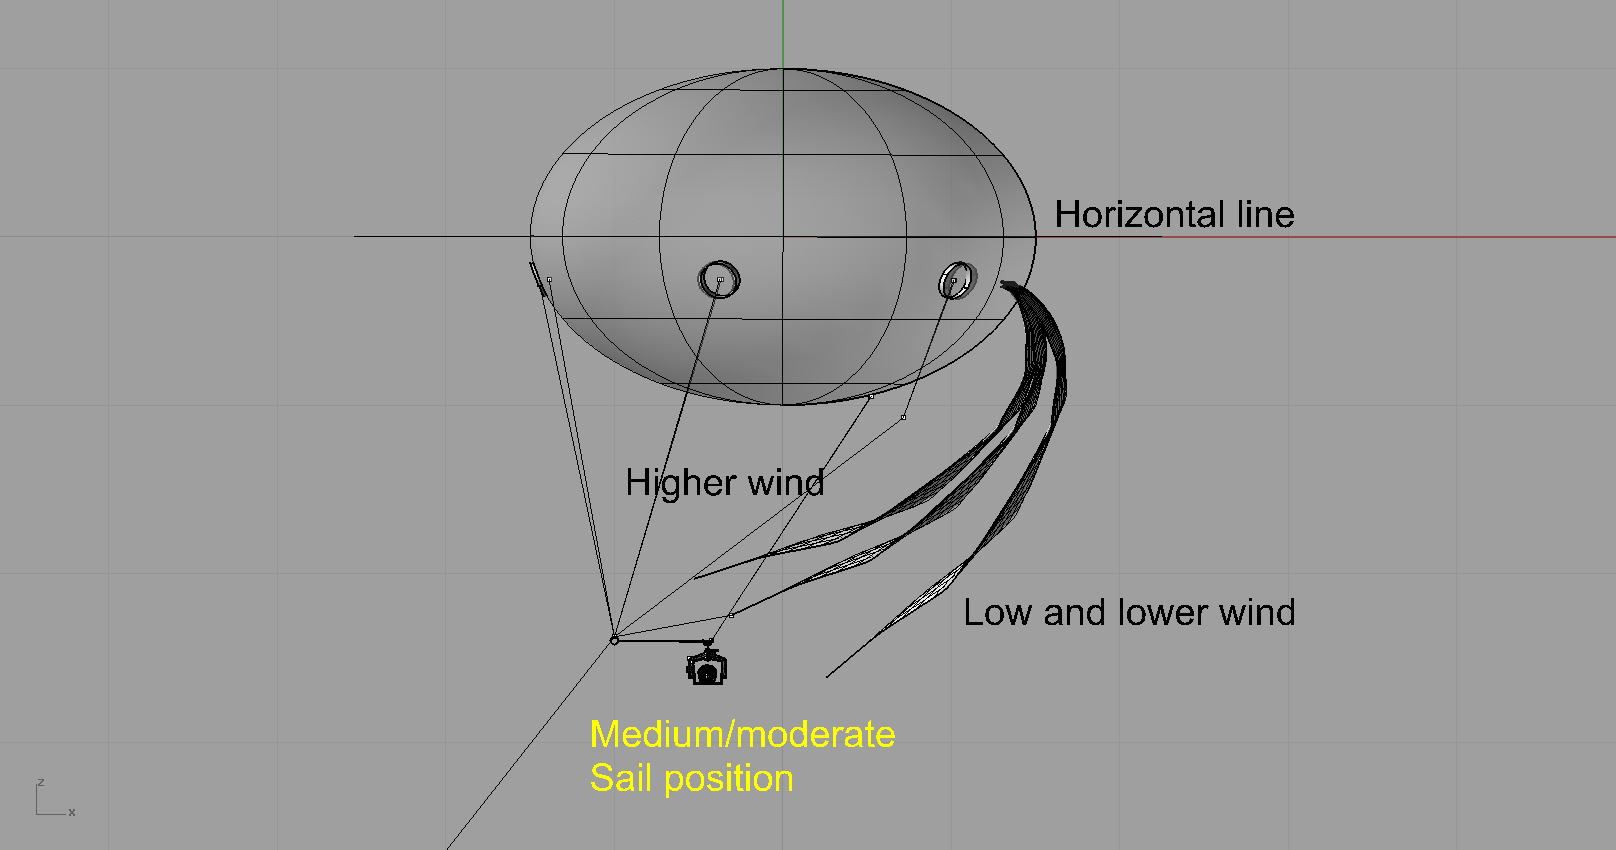 From the most slack to the most taut sail on an Aerostat
Once you have successfully adjusted the rear equatorial and stabilizer sail lines, allow the aerostat to rise approximately 5 meters into the air to verify its flight behavior. At this height, confirm that the aircraft achieves its proper pitch and floats parallel to the ground. If the alignment is correct, proceed to configure the two lines for the T-base rigging platform. It is essential that the T-base remains perfectly parallel to the ground to ensure your camera or sensory equipment functions properly during operations.Please note a critical rigging rule: ensure all connection nodes and line joints are securely tied with a minimum of four professional-grade knots to prevent slippage.Drawing from extensive field experience, we highly recommend performing your initial setups and flights under ideal weather conditions. Operating in calm, low-wind environments allows you to safely gain valuable experience and grow comfortable with the aircraft's dynamics without unnecessary stress. Over time, as you master the system's nuances, you will be able to unlock and utilize its full operational potential.Operating safety must remain your highest priority. Always perform a rigorous, comprehensive inspection of all rigging ropes and structural lines before lifting the aerostat, paying extra attention to critical load-bearing joints. The primary tether line—which serves as your main and only physical connection to the aerostat—must be inspected constantly and replaced as needed, but absolutely no later than every six months of service. Never initiate a launch sequence without first verifying the structural integrity of all primary anchoring and connection points.