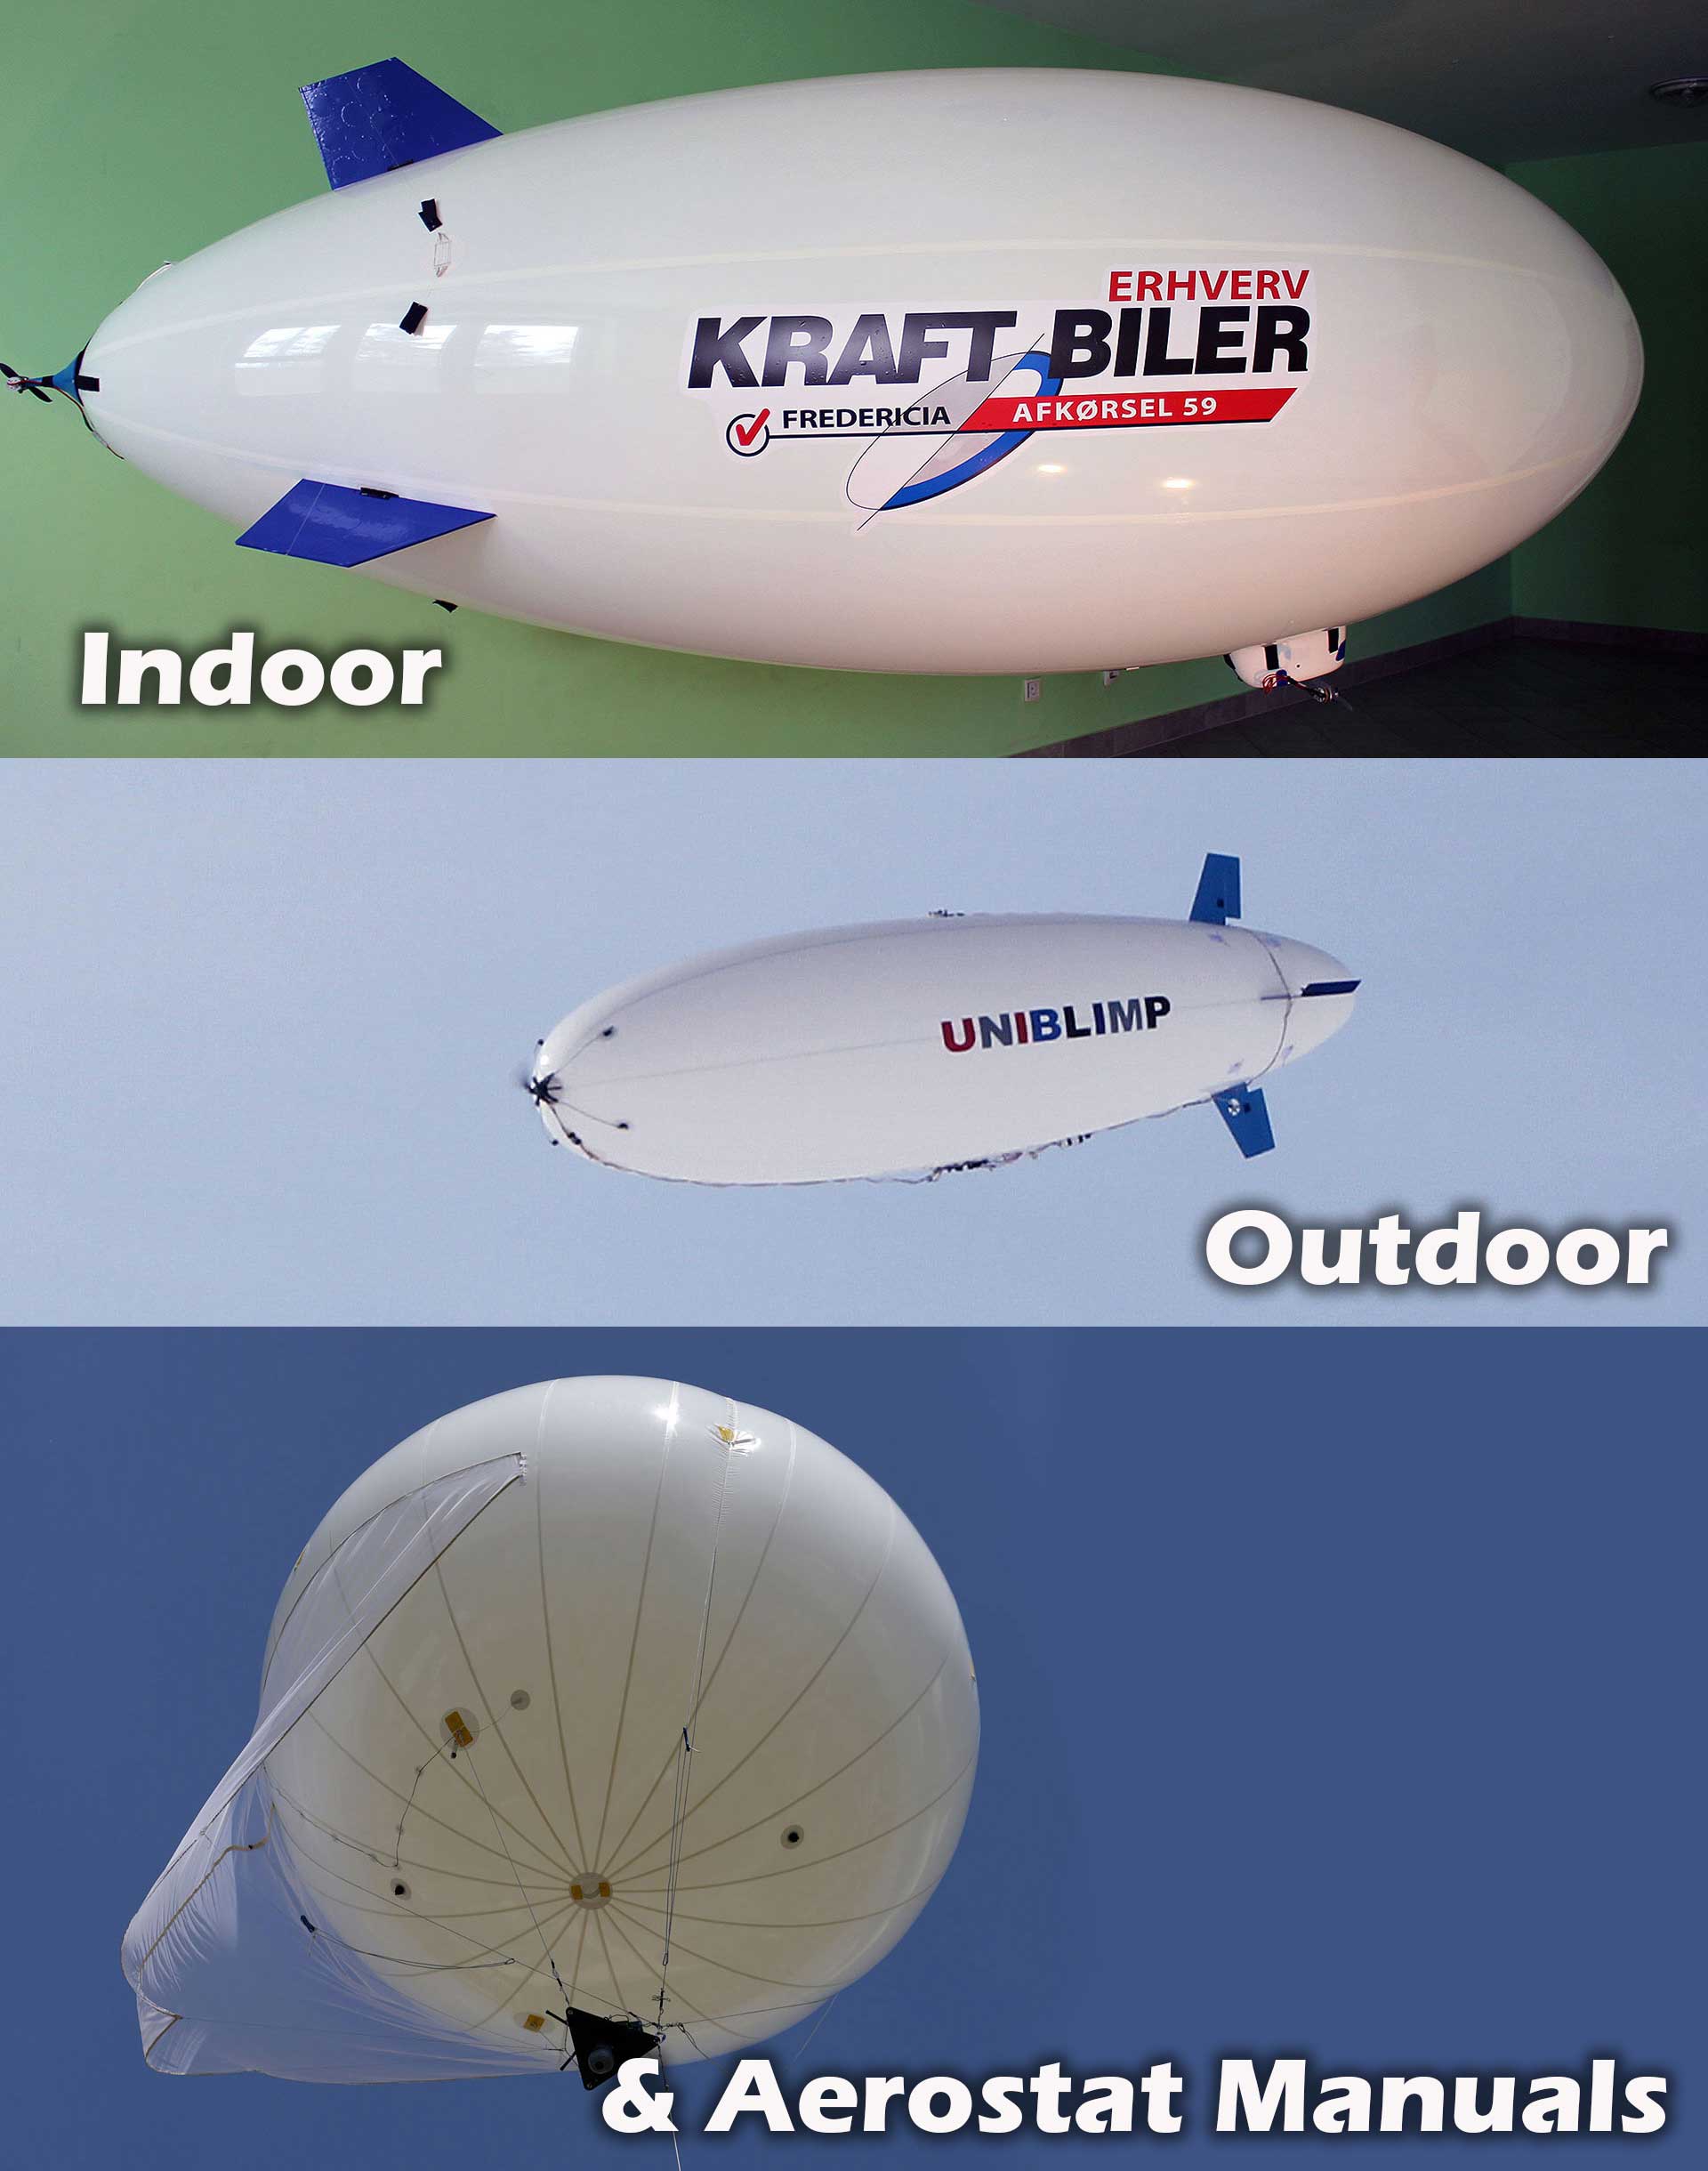
Instructions how to set and use Indoor or Outdoor RC Blimps and Aerostats
Warning: Our outdoor blimps are designed for Grisolar (Balloon gas) helium which is according to European standards. That quality is different around the world (somewhere helium is "dirtier" and therefore has a lower payload), so we recommend that you use helium 4.6, which should be of the same quality everywhere in the world. (Note:Indoor blimps (LTA in general) also require good quality helium that you use)
1. INDOOR RC BLIMPS Manual (2 m, 3 and 3.5 m and 4.5 m)

IMPORTANT: A blimp is not a drone (quad, helicopter, plane,...) but a lighter-than-air aircraft. Which means that the style of setup and piloting is unique to blimps. The most important thing is that you balance it well and that its horizontal axis is parallel to the ground. A well-balanced blimp is one that just floats in place with no lift up or down - it just floats. That way, you will easily and simply pilot it and enjoy it. Example here.
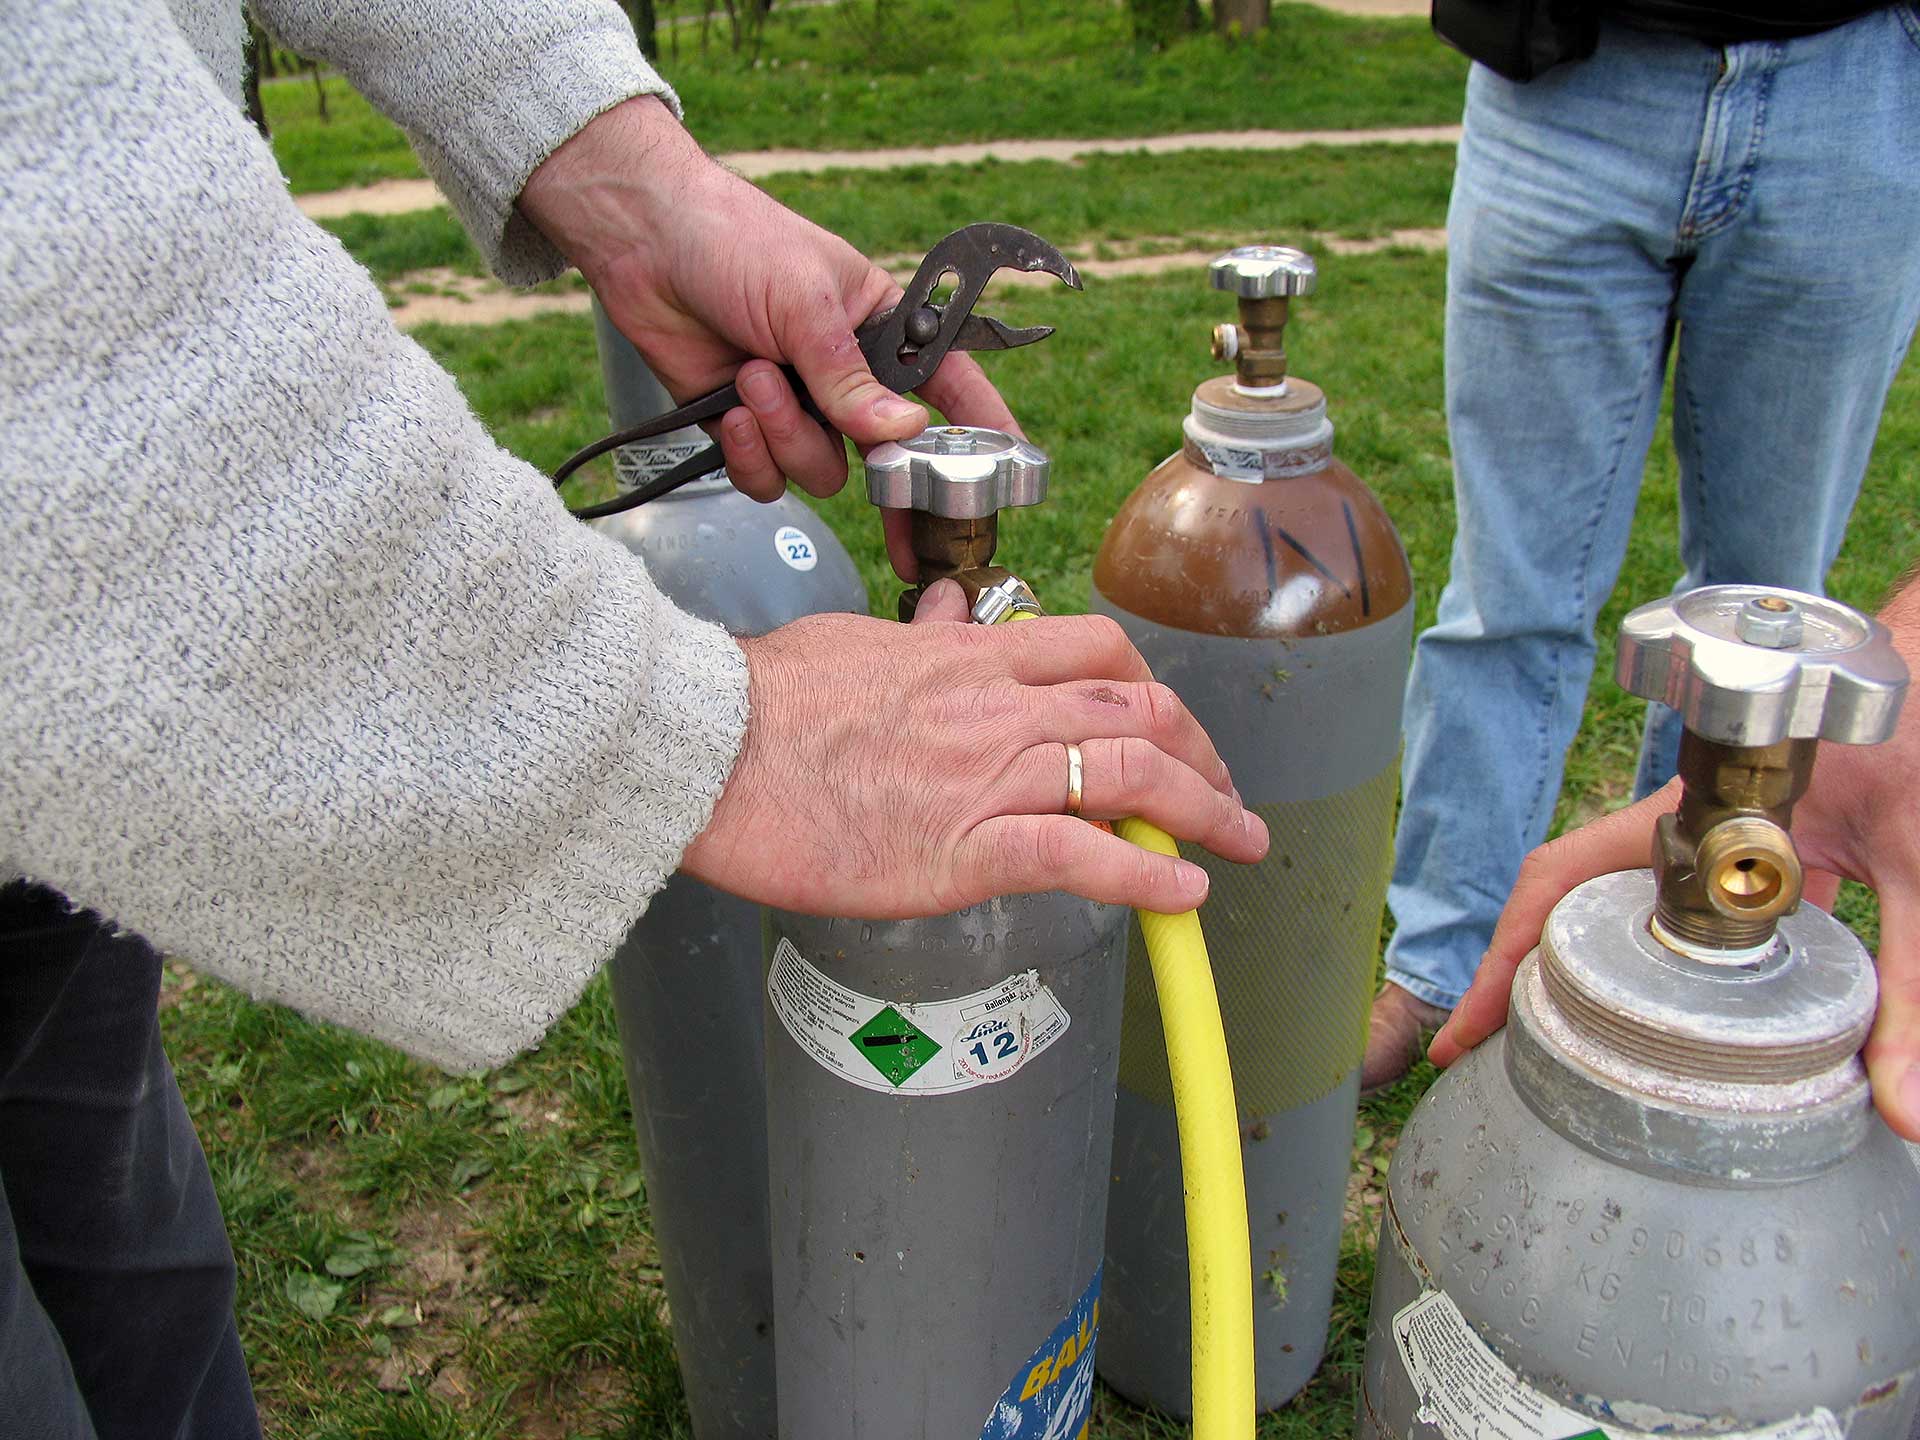
Note: With the Ready to fly you receive all needed to fly the blimp except: - Helium container (The Blimp is designed for helium – balloon gas, but helium 4.6 or 5.0 can also be used) - Reduction valve from the helium container to the filling hose Both can be found in any helium gas provider shop (Messer, Linde or other local gas dealers).
How to inflate the envelope
Balancing the Blimp
Quick recapitulation
The blimp is pretty simple to set as all components are different. Probably it is a new thing to you so we recommend that you inflate the blimp with air and set all the components on it. This way you will familiarize yourself with the blimp and its components. When confident enough (or you can skip that) follow the next steps.
How to fly and control the Blimp
Important - Not to forget!
We recommend that, if first time flyer, that you set the Blimp completely and fly around using the provided safety line that you attach behind the cabin (where the main motor is situated). When you master the controls and feel confident you can detach the safety line and fly freely. Take care that you have with one battery charge between 20 and 40 minutes of flying depending on the piloting style. Always change the battery in time and continue flying. Enjoy flying!
2. OUTDOOR RC BLIMPS Manual (5,6,7,10,12 m and Custom)

We strongly recommend that you approach the use of outdoor RC blimps through the following steps: First step: Inflate the Blimp with air indoors and place all the elements on it - this way you will get to know the appearance of a fully equipped blimp without risk Step Two: Indoors, inflate the Blimp with helium and practice RC control - that way you'll get a feel for how the Blimp behaves. Third step: After the first two steps, inflate the blimp with helium in an open space and practice RC control while tied - in this way you gain the skill of controlling the blimp without risk. Fourth step: Only after the first three steps can you detach the blimp and practice free flying outdoors
Introduction
Unlike indoor RC blimps, outdoor RC blimps require a certain level of skill in controlling radio-controlled flying objects. Flying indoors is almost risk-free since the conditions are controlled, while flying outdoors has its own challenges. A good and unique feature of RC Blimps is that they naturally stabilize when you completely stop using the radio control. So, if you did not perform the maneuver properly, release the radio command and the RC Blimp will stabilize itself. Outdoor RC Blimps are sensitive to wind because they have a large envelope area. You have to keep in mind that these are practically large sails in the air. So, we recommend their use in winds up to 10 km/h and gusts up to 15 km/h. Depending on the design of the blimp and the skills of the RC pilot, it can be flown in slightly stronger winds, but not drastically. We suggest to all our clients to fly early in the morning and late in the afternoon, when the wind usually calms down, and during the day when the weather is calm.
Steps in the process
Inflating the Blimp
If possible, it would be best if the first installation of the Blimp is in a large closed space. Another smart precaution would be to first inflate it with clean air (not helium) and familiarize yourself with all the components that make it a blimp. If you do not have these conditions, be extra careful. First, to protect the envelope from accidental damage, place a protective film on the floor. Take out and gently spread the envelope on the protective film. Be sure to tie the envelope with safety ropes so that it does not accidentally escape when it is filled with helium. There are several types of helium. Grisolar (Gas for rubber children's balloons). Helium 4.6 and Helium 5.0. We design blimps to use Grisolar (German name) helium which has admixture of other gases so we recommend its use (partially because of the lower cost). However, you can also use more expensive, cleaner helium - it depends on you.
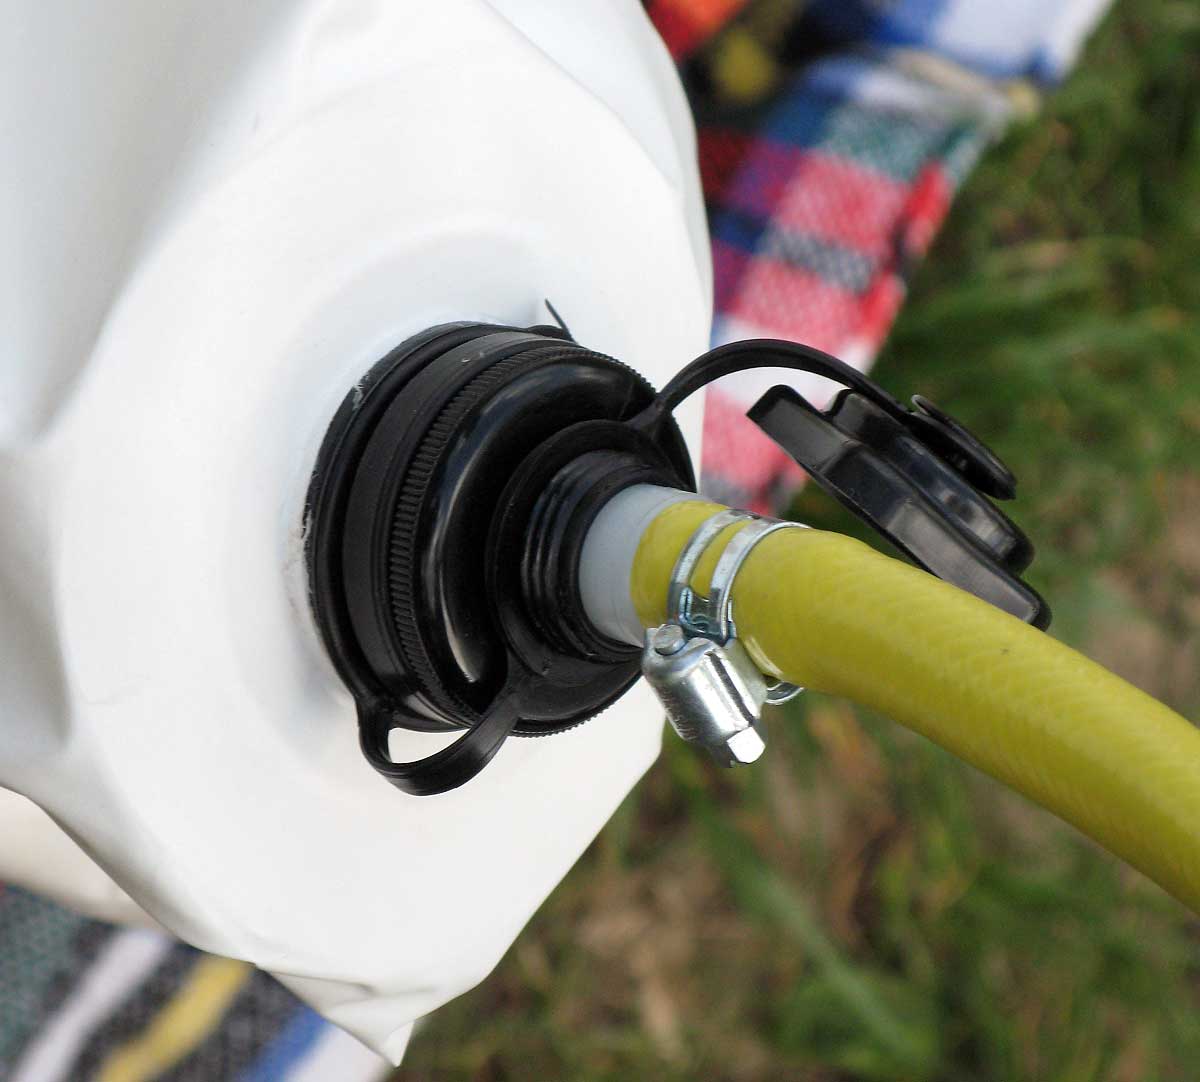
Place the hose on the helium container and begin gently filling the envelope. Note: use as little pressure as possible to prevent the ice from damaging the envelope. For the first puff, fill the Blimp to approximately 90% capacity and stop to allow the gas to equalize to the outside temperature. While the gas "calms down", start adjusting the components on the envelope.
Setting all components on the envelope
Now that you have filled the envelope to 90% and it has risen from the ground, you can start placing the components.
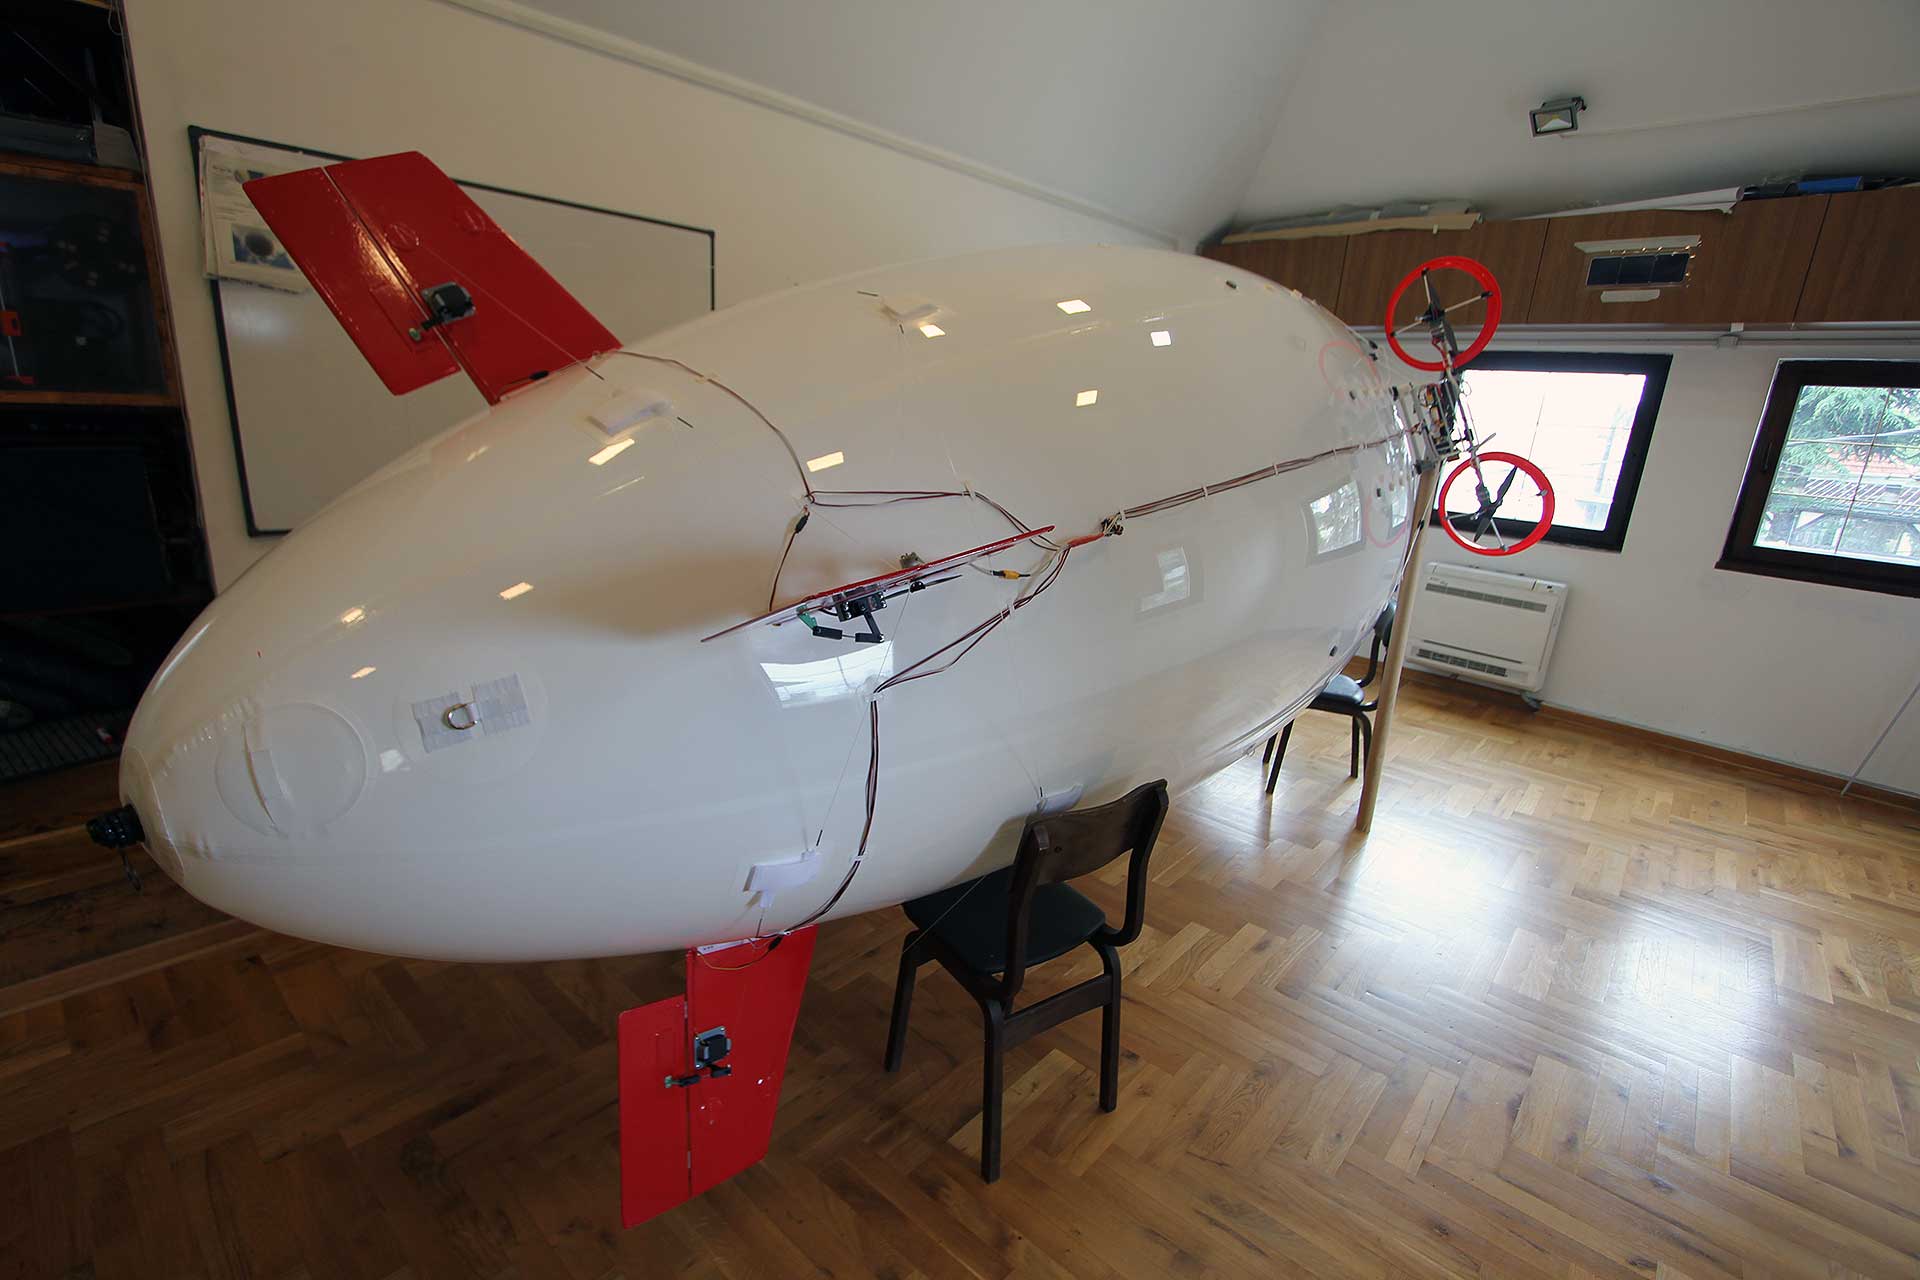
The classic design of the outdoor Blimp has the following components: Stabilizers with flaps (generally 4 pieces), Gondola with batteries and electronic components, safety valve (built into the envelope), safety spool with 100 m of rope, reverse motor on the tail of the Blimp (in larger Blimps) and additional battery and other synchronized RX also in larger Blimps. Please note that all components are tested and synchronized in our workshop before packaging and shipping. You can't go wrong with the placement of components, since each component or group has its own unique placement and hanging system. Please use the pictures we sent you while working on your blimp.
When the Blimp is filled with gas up to 90% and with all components, you can move on to balancing.
Balancing the Blimp
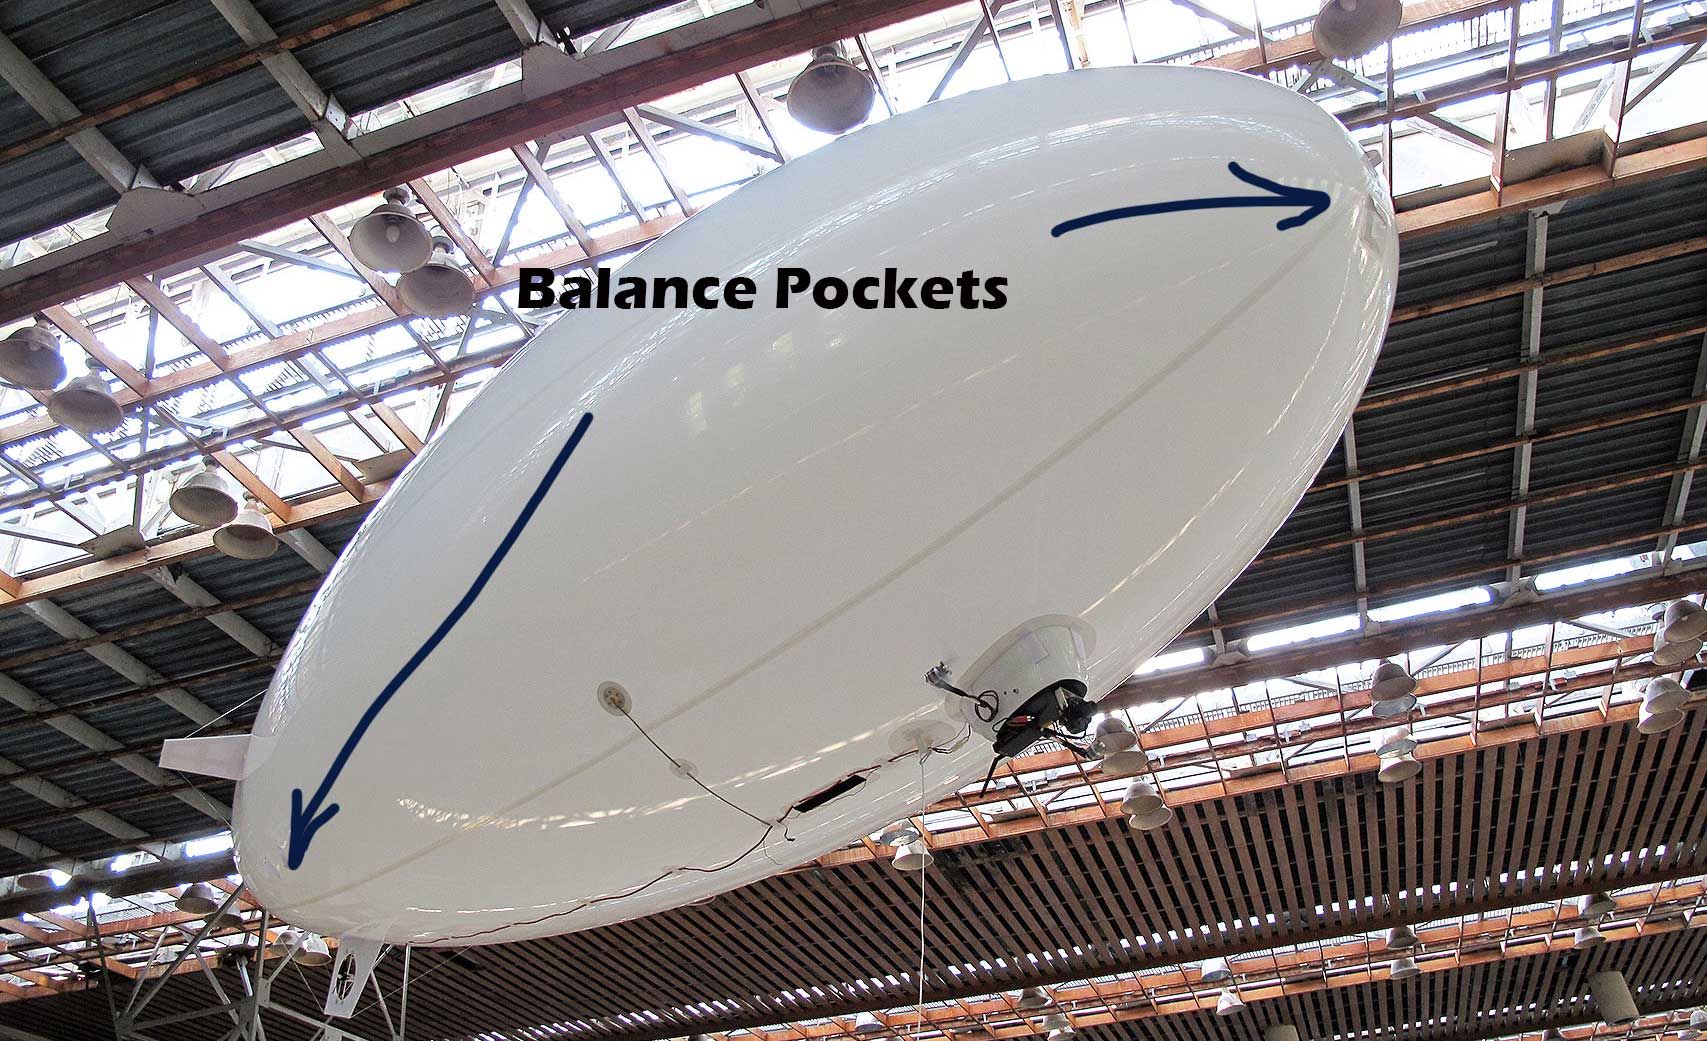
Balancing the Blimp is key to good and smooth flight in open space. Note: Do not remove the safety ropes yet. You can now fill the Blimp up to 100%. 100% is considered when it is tight in the middle and slightly soft at the ends. Creases at the end and beginning of the welds are normal.
The gondola with electronics has several positions to which it can be placed on the system of parallel contacts. We usually put it in the frontmost position, however, if you have an additional load such as a camera or something else, you can put it in another position. Generally when you place everything on the envelope the Blimp should be parallel to the ground (horizontal axis of the Blimp parallel to the ground). It doesn't have to be perfect as you are now moving on to fine balancing.
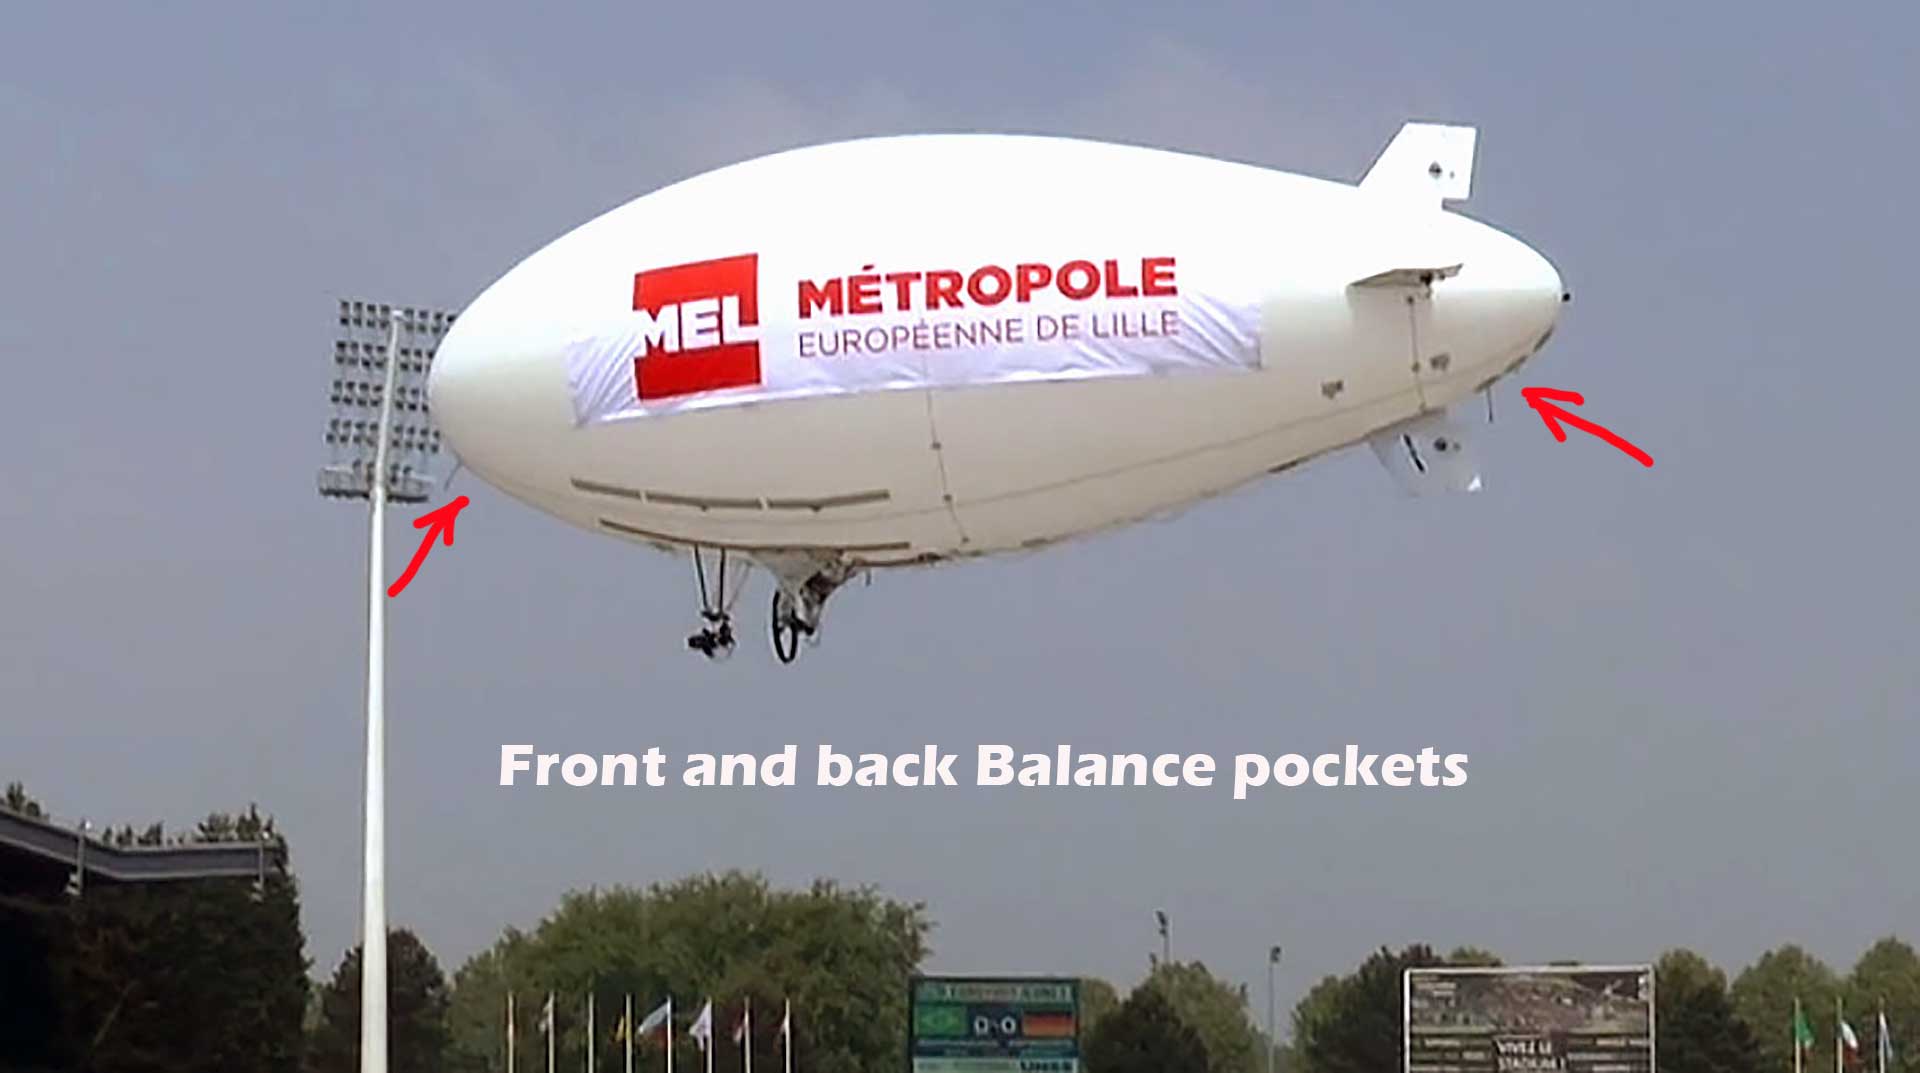
Fine balancing the Blimp is using provided lead and putting it in your front or back pocket. A well-balanced outdoor blimp is when it is parallel to the ground and when you completely release it (and the safety ropes) it falls very gently towards the ground nose first. The fact that it is a little heavier than air is compensated by the power of the engine, but it is much more manageable and partly more resistant to the wind.
Flying the Blimp
We recommend that you fly for the first time indoors or when there is minimal or no wind. In this way, you make the process of balancing and learning how to operate the RC Blimp easier. To begin with, we suggest keeping the Blimp hooked to the hook at the back to "feel" how the Blimp behaves.
The moment you think you've mastered the basics, we suggest you completely release the blimp and start free flying in short circles.
Never fly a blimp alone and always have a conscientious helper to release and accept the blimp when it lands. In this way, you avoid the possible impact of the Blimp on the ground and unpleasant damage.
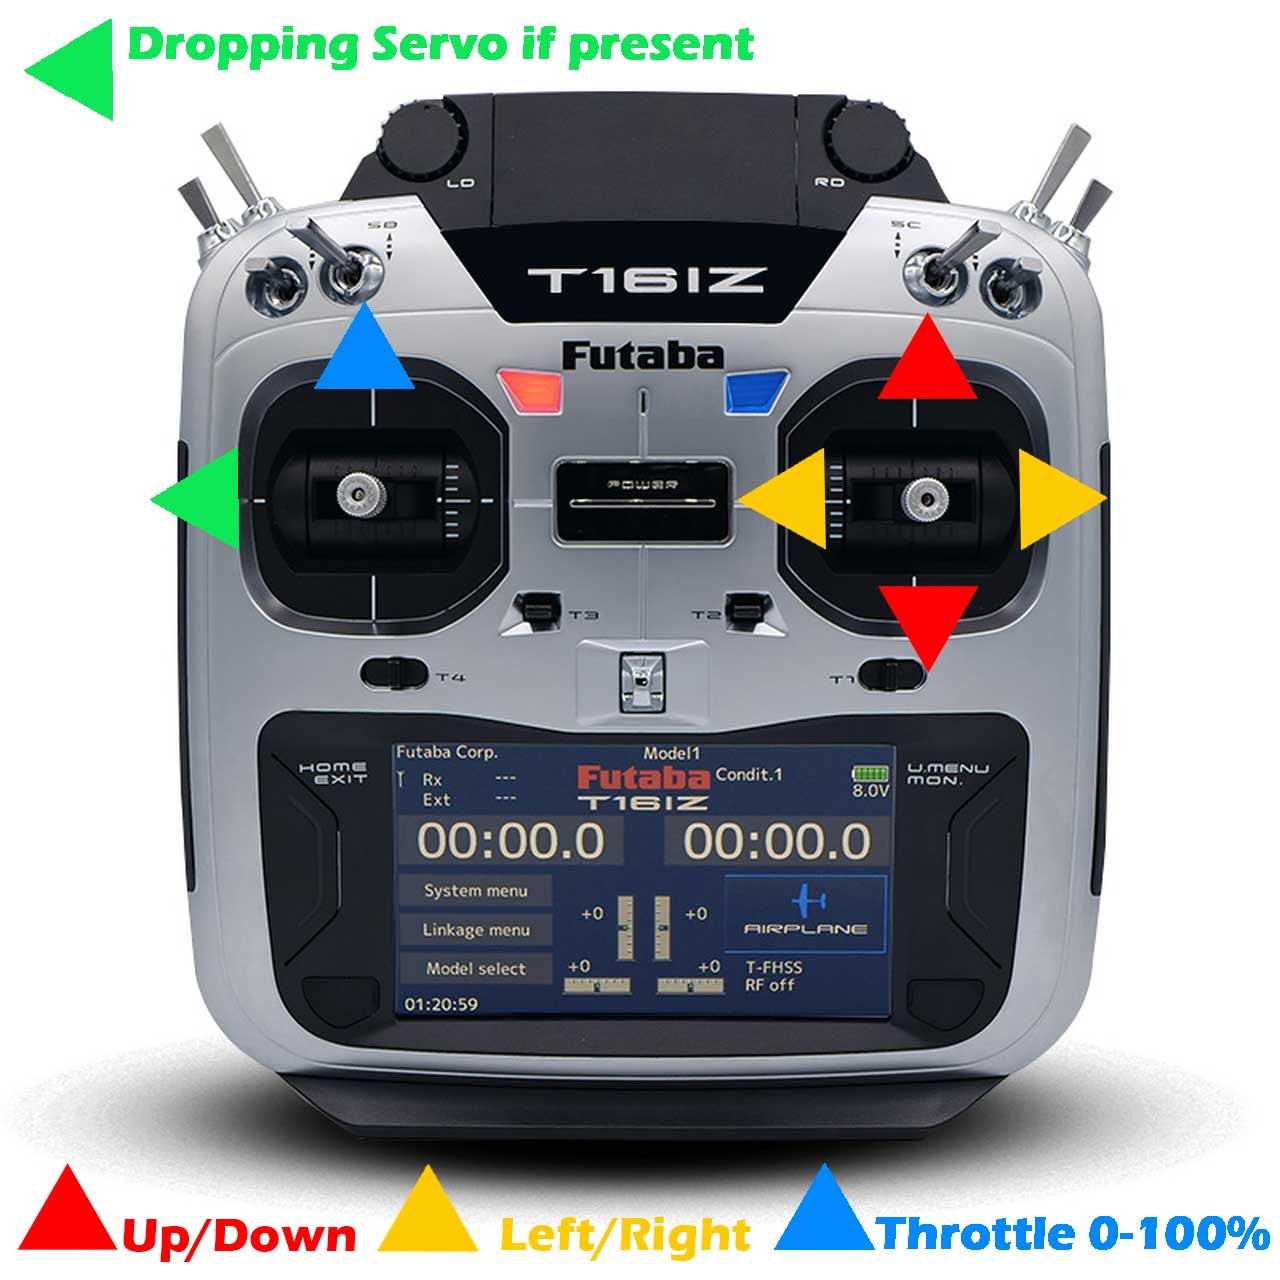
Typical RX/TX setting
Storing the Blimp
Store the Blimp carefully folded in a dry room at room temperature. If after flying you notice that the envelope is wet, be sure to wipe it and let it dry before folding. Remove all components from the Blimp and place it safely. Never stack the envelope with the components as you can damage it. Leave the batteries safe as well as the gondola. We suggest that you return the components in the box in which you received them.
If you damage the envelope, use the repair kit that came with the Blimp. The fix is simple. Clean the spot and the patch with Nitro Thinner. Apply TPU glue to both parts and press well.
Warnings
3. AEROSTATS Manual
Introduction
Although Blimps and Aerostats are part of the same LTA family, their essential differences are almost opposite. Blimps when well-balanced should literally float without any movement (neither up nor down). It's a little different with external blimps, where it's good that they're a little heavier than air (it's easier to control), but it's basically the same principle. Aerostats should have a hundred times greater pulling force. Ideally, limitless would be ideal, but at this level of technological development, we try to make the difference between payload and pulling force as large as possible. The Ellipsoid Aerostat (they can come I Zeppelin shapes, spheres, …) is a hybrid between the Kite and Helium balloon. The main design goal was to take the best from both. It is a very stable system with enough puling power needed for in air stability. You should understand that there is a procedure, like with any flying object, to be learned and respected. If you stick to the procedure and understand it you will have professional results in your work.
Inflating the Aerostat
The balloon is made of polyurethane. It’s an elastic material which has very good helium containing quality. It has some elasticity but you should take care not to overinflate the balloon. Helium as a gas (balloon Gas or Gris solar) is expanding and contracting under the heat, cold and air pressure therefore when inflating the balloon do it up to 85% capacity first. Install the sail and Camera rig letting the gas to accommodate to the outside temperature. After that inflate the balloon to full capacity.
Groups of ropes
Auto stabilization system
We arrived at the auto stabilization system by trial and error. At the beginning, we measured all the ropes in order to tie the Aerostat as symmetrically and correctly as possible. However, we noticed that even if you measure the rope correctly, there is a difference in the stretch and relative strength. This led to a disruption of symmetry and thus a less stable Aerostat. We have come to the conclusion, during use, to leave all connecting groups of rope in a continuous line through the connecting points. In this way, the Aerostat itself tightens all groups of ropes and brings itself into a stable, symmetrical position. The aerostat is "softly" tethered and is allowed to continuously tighten and release the groups of strings it is tethered to.
The harness system is very important for stability. The first time you set the lines and after that you just use the balloon. We recommend that you choose a very calm day to set the balloon lines as you need the balloon to be very calm.
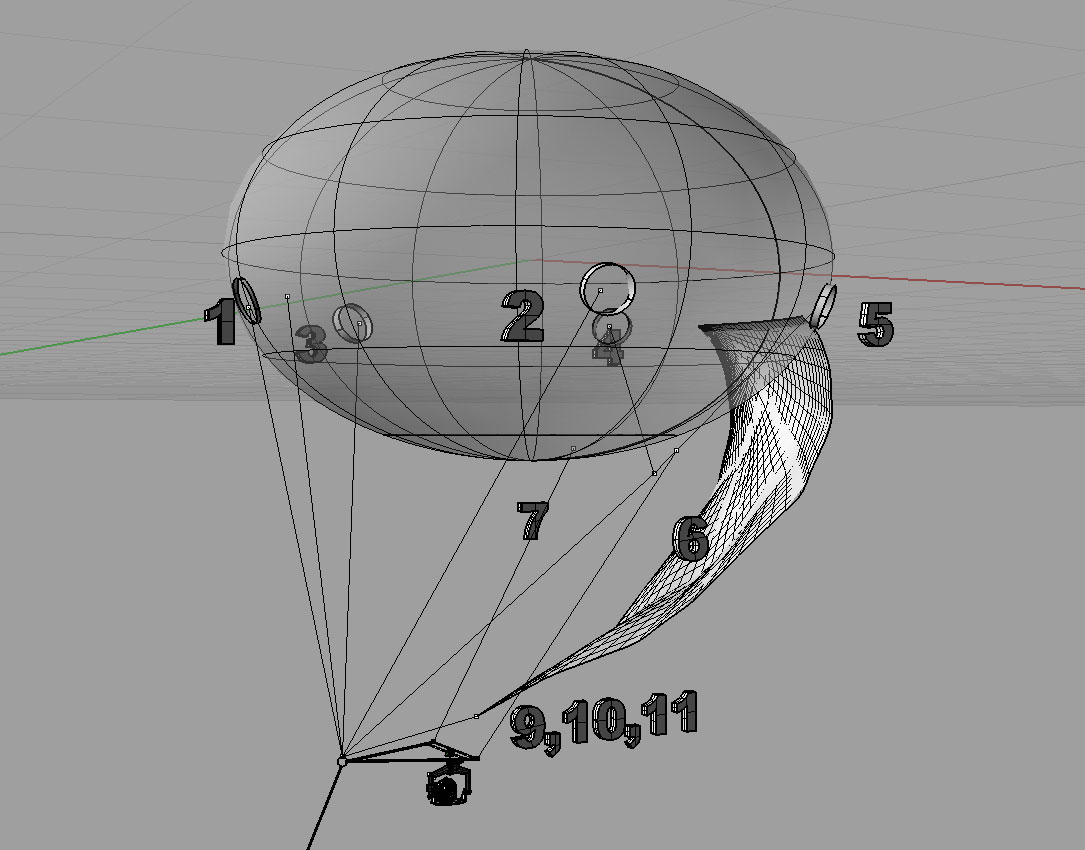
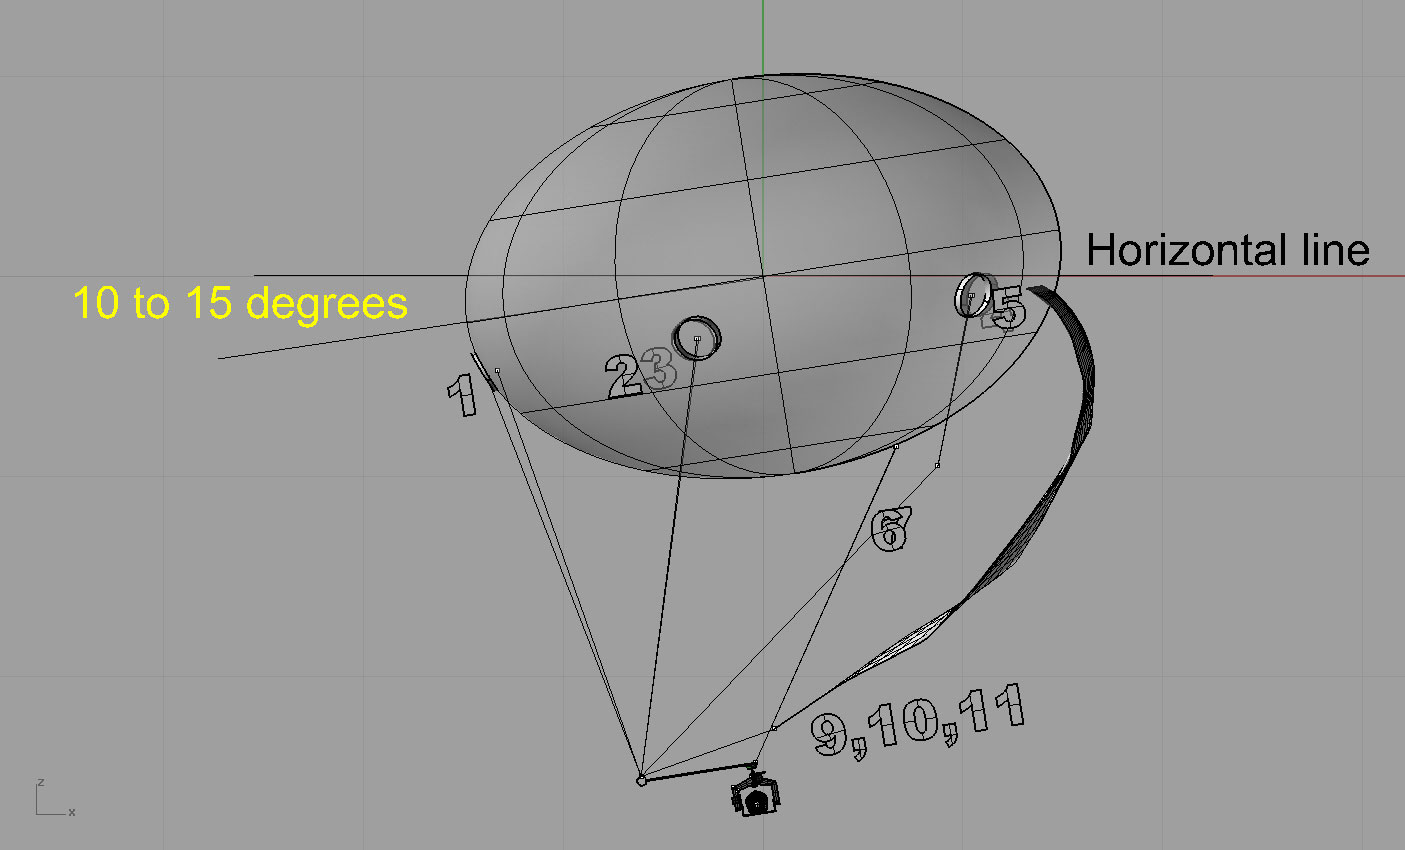
The front lines (on this graphic 1,2,3 or more depending on model/size) are preset in our workshop and they are the starting point in setting the Aerostat correctly. You need to set the length of the Stabilization sail line and back equatorial line (2 points on the back that are joined into 1 rope).
Use the provided filling hose with special adapter to the valve. On the other side of the hose a pressure reduction device should be installed on the helium container (Important: the pressure in the helium bottle is 200 Bars without the pressure reduction device you risk serious injury). Start inflating the balloon slowly to avoid frosting of the envelope.
Important: When inflating the balloon use the provided safety line to secure the balloon until fully set and connected to the main line. Also, it is wise to use hand glows to protect your hands while the balloon setting and flying.
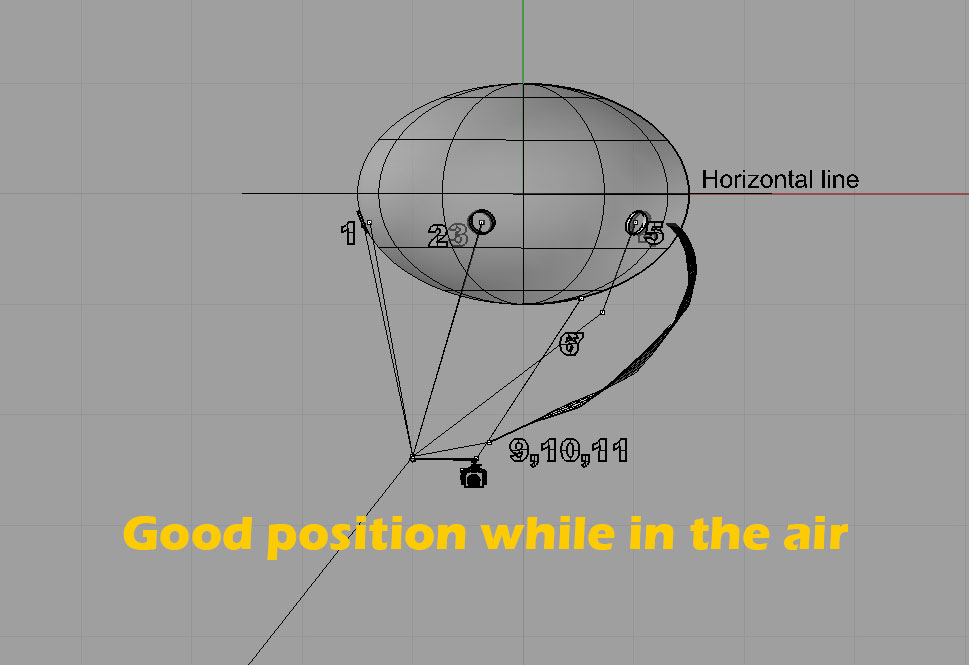
After inflated to 85 -90 % start setting the lines. The front-line length is already set so first set the back line (on the graphic 6) to allow the “nose” (front) of the balloon to be 10 to 15 % lower to the horizontal line of the balloon. This is very important as when lifted the balloon will level itself horizontally. If the nose isn’t 10-15% lower than the horizontal line on the ground the balloon will not level itself and you’ll have more aerodynamic resistance and instability than desired.
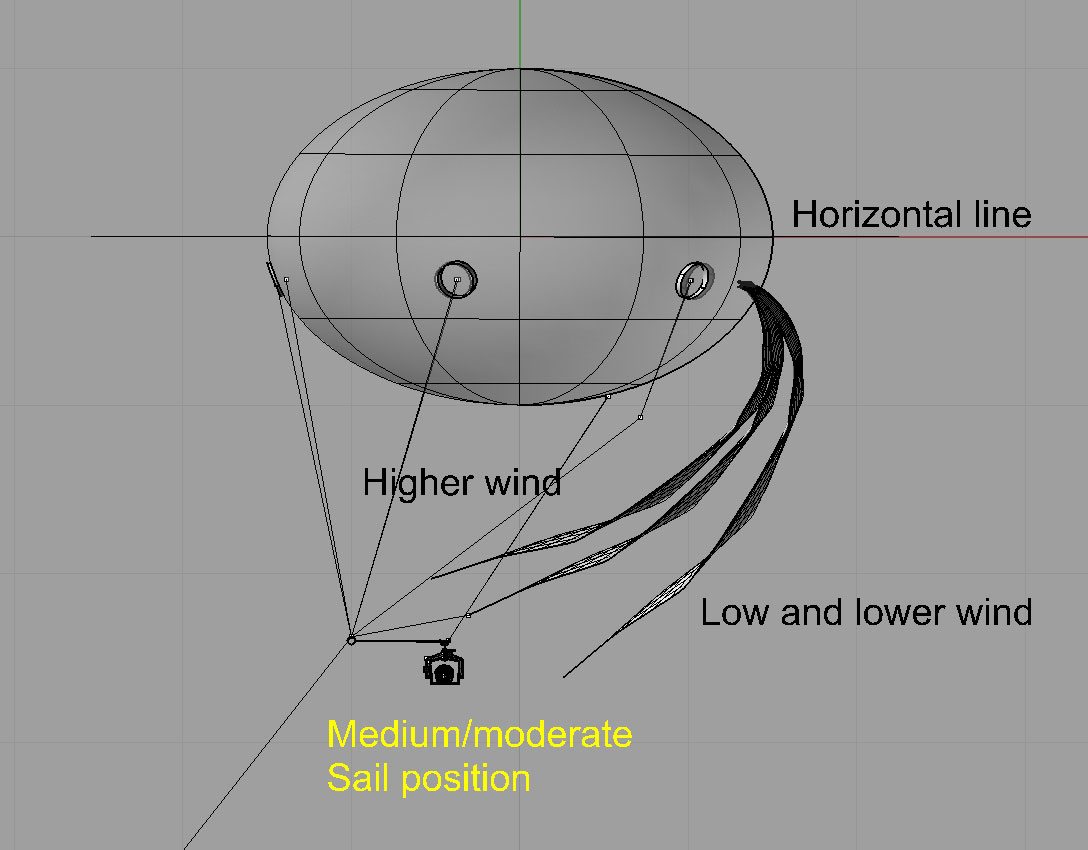
After setting the balloon lines you should set the Sail line. There are 3 basic positions of the sail. Our advice is to set the lines in the medium/moderate position and leave it like that.
Now that you have set the back and sail line let the Aerostat 5 m to the air to see if it is behaving correctly and have its horizontal line parallel to the ground. If so, now set the 2 lines for the T-base. The T-base have to be also parallel to the ground for your equipment to function properly.
Note: Tie all the connections with at least 4 knots.
Recommendation from experience: Start working with the system in ideal weather conditions. With calm and very low wind you will be able to gain experience and to bond with the System without unnecessary stress. In time you’ll be able to master the system and to use its full potentials.
Important: Always check the ropes before lifting the Aerostat. Especially the key points. Change the main rope, which is your main and only connection to the Aerostat, as needed, and no later than every 6 months. Never lift the Aerostat without first checking all main and connecting points.
